Friday, February 21, 2014

Different types of Hacking

So what is hacking and how does it work?

First off, remember that anything that you learn in this blog is to be used ONLY for educational purposes and if you use this information for malicious purposes, you may face legal prosecution. 

There are many different types of hackers, but lets first define what a "hacker" is. The media defines a "hacker" as someone who breaks into systems and steals data for their own greedy purpose. 

In the hacking world, people who actually do this are called "crackers". They crack passwords and many other things. From this you can see how the name fits, but this world expands more than this.

We can classify these people into 3 categories:
  • White hat
  • Black hat
  • Grey hat
White hat "hackers" are people who know have hacking skills and know how to exploit computers in the same fashion as "crackers", but their goal is to break into a system to better understand how to secure it.

Black hat "hackers" are people who break into a system to steal data and sell the data. These people may break into many different systems, deploy viruses, delete critical data and just flat out take out a service; they may cause havoc on a network.

Grey hat, these people are on the line of black and white. These members may use their skills for the side of good of helping other people out, but at the same time on another note use their skills to break into systems to steal data and resell it. 

I just talked about these three terms in the global world as far as the terms go, but we can talk about these terms in the world of Penetration Testing or PenTesting. Corporations may hire people to test their network. A white hat person is greatly associated with this scenario, but grey hats are people who can also be hired. Grey hats in this scenario are people who know very little about the target network. Black hat members hired to perform a PenTest know nothing about the network.

When corporations hire these members, they need to have an established set of permissions and a Non-disclosure Agreement (NDA) signed with the hiring corporation. This means that when the hired hackers find data that could compromise a company's network, they can not share it with anyone, but the company. If they share it with an outside entity, then they may face legal repercussion. 

Ethical hackers can be hired for this specific kind of testing. Ethical hackers need to follow protocol in order to provide a corporation with the necessary information they require about their network while maintaining a code of ethics. 

With all of this being said, not everyone is out to get you and not all hackers are bad. Some are out there to help you. So just remember you don't have to be on the dark side in order to know cool stuff!

Thursday, February 20, 2014

A look into the world of Tor

Tor is a free tool that anyone can download, run and use to anonymize their internet activity. Think of Tor as in you talking to someone to get information about someone else. The person you are trying to get information about doesn't know you are getting information about them because they aren't answering your questions, but you still got the information you wanted.

In order to get Tor, go to: https://www.torproject.org/download/download

Once you run Tor, it will look like the below image. It will connect to the Tor network for you.


Once you have connected to the Tor network, FireFox will open up and tell you your IP address for the network. You can now start browsing the internet and not be traced!


The below image gives you a better idea of how Tor works. User 2 is trying to communicate with User 1. Let's say User 1 is a person or it can be a website. All User 2 has to do is connect to the Tor network and ask the network to fetch the website or a connection with User 1. Once Tor does this, they can bring you back the information you requested. Tor communicates with other Tor servers via an encrypted line so there is no trace that User 2 actually communicated to User 1. 


Now these Tor routers or servers are usually PCs and these PCs can exist anywhere in the world! A person in the US can bounce their connection off a PC in Germany. This has its pros and cons though. The pro here is that it doesn't look like you are accessing the websites. The con is that it takes forever to bounce a signal off a machine halfway across the planet, to your destination and back to you.

Also note that in RED, this is an unencrypted line and any information you pass to your destination is completely visable. So you don't want to be logging into any servers. 

Just remember that this information is NOT intended to be used for anything malicious and this information is for educational purposes ONLY. I am not responsible for any legal repercussions you face for your misguided actions conducted within Tor.

Tuesday, February 18, 2014

Credit Card Numbers - In-depth analysis

Every day everyone uses a credit card to pay for many different things out there. Whether it be your normal bills, or going out to eat, but how do they work?
  • How do websites know my credit card is valid? 
  • Do they have these numbers stored or do they pole credit card providers for the information? 
These are some of the questions we will be going over today.

A good resource, even though it is Wikipedia, is: http://en.wikipedia.org/wiki/Bank_card_number

The first 6 digits help you identify the vendor of the credit card number. Depending on the vendor, it may only be up to 4.


The first digit of a credit card number is the Major Industry Identifier (MII). MII digits represent the following issuer categories:
  • 0 – ISO/TC 68 and other future industry assignments
  • 1 – Airlines
  • 2 – Airlines and other future industry assignments
  • 3 – Travel and entertainment and banking/finance
  • 4 – Banking and finance
  • 5 – Banking and finance
  • 6 – Merchandising and banking/finance
  • 7 – Petroleum and other future industry assignments
  • 8 – Healthcare, telecommunications and other future industry assignments
  • 9 – National assignment
So now we have the first few digits identified. What do the other numbers mean?

In the old days, if you typed in your credit card number and purchased something online or provided your card over the phone, the manufacture would take up to a week to tell you the credit card number is wrong.

Now-a-days they can use an algorithm to validate the credit card number and tell you right away, before you even submit your card, that it is invalid. The algorithm is called the Luhn algorithm. This is the basic concept of how it works:
  1. From the rightmost digit, which is the check digit, moving left, double the value of every second digit; if the product of this doubling operation is greater than 9, then sum the digits of the products.
  2. Take the sum of all the digits.
  3. If the total modulo 10 is equal to 0 (if the total ends in a zero) then the number is valid according to the Luhn formula; else it is not valid.
After you complete the math provided above on the given credit card number, the last digit is what you should come up with. If the digit does not match what you got, it's an invalid credit card. If it does, it's valid.

Since we like to focus on C#, I will post a C# implementation of the Luhn algorithm at a later time.

Monday, February 17, 2014

Vulnerability scanning using Linux and Nessus.

Today we will be talking about Vulnerability scanning. Do NOT perform these scans on a network you do not have permission to do so on. This is for educational purposes ONLY. It is not my responsibility if you are scanning a network you shouldn't be scanning. Always get permission FIRST before you perform any of the below items. If you scan a network you do not have permission to scan you can get into serious trouble and may even face legal action. 

The first item you will need is Virtual Box. We are using Virtual Box to allow us to virtualize 2 machines here: a host machine and a target machine. Virtual Box is free compared to VMWare, so it is preferred.  In order to get your copy of VBox, go here: https://www.virtualbox.org/wiki/Downloads

Download the appropriate version for your Operating System (OS).

Next, you will need BackBox or any equivalent Linux flavor. Perform the steps below in order to get BackBox, but first go to the website and download the appropriate version you would like: http://www.backbox.org/downloads

VBox will start up looking like the below image. You just need to click "New" from here.


It will ask you the Name, Type and Version. Enter the below data and give it a name.


Next is memory, you will want to give it a significant amount of memory so it can perform things in a quick manner. The more the better, but up 4 GB should be good enough.


Now you will need to create a virtual Hard Drive for this machine. You can slice out up to 15, but I would recommend 20 GB.


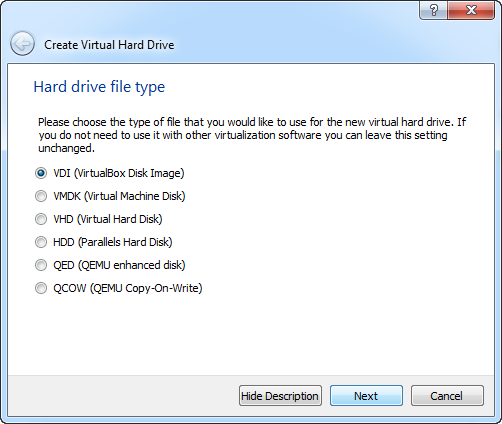
It will ask what format do you want to slice the Physical Hard Drive into. I usually do it in a VDI format, but VMDK will work, too. (any really)


Make sure you enter it as "Fixed Size" or the hard drive will grow based on the needs of the OS and if your Virtual Box gets too cluttered, it will eat up the Host's space. We don't want that!


Here is where you select the size, remember I stated 20 GB is good.


Below is what you will see as it creates this new HDD.


Once you create this HDD, when you create NEW machines later on, you can attach this HDD to other Virtual Machines as it will prompt you here below: 


Before you boot BackBox, make sure you have the image you downloaded from the website set to the disc shown in the picture below. If you only have the .vdi (the virtual Hard Drive) and now disk, then you will be essentially booting a blank Hard Drive. Click the disk or in this case "Empty" and on the right under "Attributes" you can select a disk or image to have mounted in your virtual tray when you boot. 


Once you boot from the image and you have your Virtual Hard Drive ready to go, you will see the below screen. Go ahead and hit enter on "Try BackBox without installing"


 Once Back Box boots up you will have an icon on your desktop telling you to install it. Go ahead and double click that and let it run. It will first prompt you to pick a language.


Once it completes, you have Back Box installed and you are ready to go!

If you want to burn a disk and install BackBox this way, then here are the instructions:

Steps to take to get BackBox - Linux working:

Make sure that your computer is set to boot from the cd drive.
  1. Insert the BackBox disc into your CD drive.
  2. Start or restart your computer.
  3. Select "Try BackBox without installing"
  4. Click "Install BackBox Linux". The "Language" screen appears.
  5. Select your desired language and click "Forward"
  6. Select the location closest to your location and click "Forward".
  7. Select where do you want to put BackBox and click "Forward".
  8. Enter the requested information, and click "Forward". The "Ready to install" window appears.
  9. Verify that the language, layout, location, and personal information are correct and click "Install". The installation wizard begins.
  10. When the installation wizard finishes, the "Installation complete" window appears.
  11. Click "Restart now" to restart your computer. BackBox is now installed!
  12. Getting VirualBox Guest Addons to work: http://www.dedoimedo.com/computers/virtualbox-guest-addons.html
I wont explain how to install Metasploitable 2 in details because there is a great video tutorial located here on Youtube:

Installing Metasploitable and getting it up and running: https://community.rapid7.com/message/4137#4137

Installing Nessus: http://uwnthesis.wordpress.com/2013/07/31/kali-how-to-install-nessus-on-kali/

Once you download Nessus, you just need to run it:


Once you have ran the debian and Nessus is installed. You just need to start the service and browse to the website: https://127.0.0.1:8834 to configure Nessus. 

You're now ready to start scanning Metasploitable 2!

Disclaimer: I am not responsible for any damage or any malfunctions that may occur during the process of installing this application and use.

Sunday, February 16, 2014

Scripting with Microsoft's PowerShell - Advanced

Lets sharpen our PowerShell scripting skills. Today we will be looking at a script and going through it. Here is the script:
  1. write-host
  2. write-host "Which option would you like:"
  3. write-host 1: "Choice 1"
  4. write-host 2: "Choice 2"
  5. write-host 3: "Choice 3"
  6. write-host 4: "Choice 4"
  7. write-host 5: "Exit."

  8. $userinput = [Console]::ReadLine()

  9. Function switchUserInput ($userinput)
  10. {
  11. switch ($userinput) 
  12. 1 {write-host "You chose option 1"} 
  13. 2 {write-host "You chose option 2"} 
  14. 3 {write-host "You chose option 3"} 
  15. 4 {write-host "You chose option 4"} 
  16. 5 {exit} 
  17. default {"You must enter a number between 1 and 5"}
  18. }
  19. }

  20. switchUserInput($userinput)

So lines 1-7 provide the user with options/choices to pick from. Line 9 waits for the user to enter a key. Once the user enters the key, we check what key they entered on line 24.

Line 24 calls a function that is defined on line 11. We need to define the function we want to use before we use it so we defined it first here. The function is called "switchUserInput" and it takes a variable named "$userinput". Once the function is called and ran, it puts the variable inside a Switch statement. Based on the value of what $userinput is, it executes the command. You can have it written to the screen or have it execute another function.

The below image is what the script looks like when ran:


In order to make this script slightly better, we can make it so the user has to exit the script instead of auto-exiting.

In order to do this, we just have to expand the function. Add this after the switch statement:
  1. write-host "Would you like to return to main menu?"
  2. $choice = [Console]::ReadLine()
  3. if(($choice.ToLower() -eq "yes") -or ($choice.ToLower() -eq "y"))
  4. {
  5. write-host
  6. write-host "Which option would you like:"
  7. write-host 1: "System related."
  8. write-host 2: "Group related."
  9. write-host 3: "Server task related."
  10. write-host 4: "Query related."
  11. write-host 5: "Exit."
  12. $mainMenuReturn = [Console]::ReadLine()
  13. switchUserInput($mainMenuReturn)
  14. }
  15. elseif (($choice.ToLower() -eq "no") -or ($choice.ToLower() -eq "n"))
  16. {
  17. exit
  18. }
  19. else
  20. {
  21. write-host
  22. write-host "You did not enter a valid option."
  23. write-host "Main menu: "
  24. write-host
  25. write-host "Which option would you like:"
  26. write-host 1: "System related."
  27. write-host 2: "Group related."
  28. write-host 3: "Server task related."
  29. write-host 4: "Query related."
  30. write-host 5: "Exit."
  31. $mainMenuReturn = [Console]::ReadLine()
  32. switchUserInput($mainMenuReturn)
  33. }

So line 1 we ask them if they want to return to the main menu, then line 2 we wait for their input and store it in a variable named "$choice". We then have an IF statement testing what they entered. We do not want to be case sensitive here so we convert their answer TOLOWER. If they entered "yes" or "y”, then we post the choices again in lines 5 through 11. We then wait for their answer and store it in "$mainMenuReturn". We then call our function: "switchUserInput" and pass it the appropriate variable.

If the user enters "no" or "n", then we simply exit the script.

If they enter something besides "yes", "y", "no" or "n", then we wait to tell them that they entered the wrong choice and repeat the choices for them.

Now our script is complete! We can now provide a menu of choices for the user and recursively run until the user does not want the script running anymore.

Scripting with Microsoft's PowerShell - Beginner

We will be taking a step into the world of scripting with PowerShell. PowerShell scripts file extension end with ".ps". They are normal text documents and can be edited in any text editor.

Here are some instructions on creating and writing your Hello World for PowerShell


  1. Create a text file and name it "Hello.ps1"
  2. Open up this file in a text editor of your choosing.
  3. Write inside of this text file: "write-host "Hello World.""
  4. Open up PowerShell 
  5. Make sure your default location is set to the same folder of the location of the file. You can also drag and drop the file to your PowerShell window and press enter.
  6. Once the command runs, you will see it write Hello World.

If you are running PowerShell for the first time, you may see this:


If you see this error, this means that you have unsigned PowerShell scripts set to restricted or as in they cannot run. In order to check this, type: "GET-ExecutionPolicy".

If it returns "Restricted", then this means you need to change the Execution Policy.


In order to do this, type "SET-ExecutionPolicy remotesigned". Before you do this, you will need to re-open PowerShell with Administrative Privileges.

Once again check to see what the policy is by typing: "GET-ExecutionPolicy". Verify it does not say "Restricted".

In order to return the settings back to the original settings, simply type: "SET-ExecutionPolicy restricted"

Congratulations, you just wrote your first PowerShell script!

Saturday, February 15, 2014

Basics of Microsoft's PowerShell

Window's PowerShell (PS) is Microsoft's task automation and configuration management framework, consisting of a command-line shell and associated scripting language built on .NET Framework. Today I will be going over a few basic commands you can run immediately to get you going into exploring the full capabilities of PS.

Starting with the GET commands try going to the Start pearl in the lower left hand corner of Windows 7 and in the search bar type in "Power Shell". Once it is up and running, you can type in "GET-ACL". ACL stands for Access Control List.


The next simple command is just to get the date. Type in "GET-DATE". Now this may  seem like a simple function that serves no real use, but when you start writing scripts and you want the script to perform a particular action at a certain time, you'll need to call this function and store the data, then write an IF/ELSE statement to handle it. This gives you more control over your Operating System and within your Script.


If you are unsure on what commands are available or need help, you can type "GET-HELP".


Instead of using Windows Task Manager which lists all the currently running processes, you can run "GET-PROCESS" to dump a listing of currently running processes and you can save this data in a text file. In your script, you can say something of the nature of "IF problem GET-PROCESS". This is, of course, pseudocode.


If you would like a full listing of a specific kind of command, you can use regular expression within GET-HELP. You can type something such as "GET-HELP-Name Get-*" and this will dump out a full listing of all Get commands.


Just like dumping out what the currently running processes are, you can also dump out the currently running services and their current state. Use the command "GET-SERVICE" to get a listing of this.


I did not jump into the scripting capabilities, yet. I will have another posting for diving into the scripting facet.